INTRODUCTION
I am often asked by friends new to mountaineering or climbing just what the grade numbers mean. What is the difference between
class 3 and class 4? What is the difference between a 5.7 climb and a 5.10 climb? Just what is a 5.15? And what about those letters? Is it really possible to accurately and effectively subdivide a grade like 5.10 into four, lettered subgrades? Not to mention Aid and protection ratings and the vague Roman numeral grades. This article is an attempt explore a very complex and dynamic grade scale that is the Yosemite Decimal System for grading terrain.
You hear a lot of numbers thrown around in discussions of route difficulty. It's important to remember that any attempt to reduce something as complex as a mountaineering route to a few numbers is bound to be flawed. Any class rating is an oversimplification at best and is certainly not capable of telling the full story about the route you will experience. Attitude, body shape, climbing style, etc, will play major factors in a route's perceived difficulty. Difficulty ratings also don't incorporate other issues, such as protection, rock quality, belay/rappel anchors, weather conditions, rock conditions, etc. Difficulty ratings are also subject to local interpretation, and you might here terms like "soft" or "sandbagged" applied to certain crags. In my backyard, Rifle Mountain Park--a famous limestone sport climbing area--is often called "sandbagged", meaning that the grades climb harder here than other places.

It is also important to note the difference between gym, sport, traditional (trad), and alpine climbing. A person comfortable at 5.10 on bolts or at the gym may panic on a 5.7 trad climb. Alpine routes especially bring their own unique difficulties, and even low 5th class (which I have labeled as "easy") can be quite advanced considering the length of these routes and the objective hazards of a mountain environment. Always seek as much information as you can before attempting a route. Consult locals, buy route guidebooks, and surf your favorite web-beta climbing site to maximize safety.
That being said, difficulty projections are useful to gain a rough idea of the technical demands a given route will entail. A knowledge of the scale, therefore, is important. Consider the following article as a rough guideline to understanding the current system for grading terrain in the United States. Bear in mind two things about my opinion of these grades: I have a Western Colorado bias, which might compare to your local understanding in different ways. Our climbs might be rated harder than yours, or they might be easier. It is hard to say. The truth is, however, that the only way to really understand a grading system such as the Yosemite Decimal System is to experience the rock and subsequent ratings for yourself.
|
|
|
|
|
|
| Class 1 | Class 2 | Class 3 | Class 4 | Class 5 |
HISTORY
The original Yosemite Class System was created by the Sierra Club in the 1930's to taxonomize the difficulty of various hikes in the Sierra Nevadas. Class 1 was simple trail walking, and class 5 was considered technical climbing. It was soon discovered that class 5 encompassed such a large group of rock that it was sub-divided into a decimal system. This decimal extension was created and developed in Southern California to classify the difficulty of various routes at Tahquitz and Suicide Rocks. The "old-school" scale started at 5.0 was capped at 5.9. As climbers and their gear got better, even harder climbs were being sent, and the need arose to open the scale. The YDS scale has now
been pushed to 5.15c, though only a handful of such routes exist in the world.
YDS CLASS
General terrain difficulty grading system (U.S.):
| Difficulty Level | Type | Description | Alpine Examples |
|---|
| Class 1 | Trail walking | This includes everything from paved concrete at the easier end of the level to very steep but well-defined alpine trails. Using your hands for balance even occasionally is usually not necessary. | Mt. Elbert, Northeast Ridge; |
| Class 2 | Off-trail hiking | Uneven terrain or very rough trails that require considerable attention to footwork. Hands are possibly used on occasion for balance but not relied upon for significant periods. | Torreys Peak, South Slopes; Holy Cross North Ridge |
| Class 3 | Scrambling | Hands are now used for upward movement continuously. Holds may be selected and tested but are plentiful and very easy to grip. Third-class terrain is probably never fully vertical. Most people do not need a rope to ascend class 3. An indicator of class 3 is that most people can downclimb it facing outward. | Longs Peak, Keyhole Route; Mt. Evans, The Sawtooth |
| Class 4 | Hard scrambling/easy climbing | Hands used continuously for upward movement. Class 4 is sometimes close to vertical but has very good and abundant holds. Some people may want a rope on class 4 terrain but most will not. A key difference between class 3 and 4 is that many people feel the need to downclimb class 4 facing inward. | Capitol Peak, Northeast Ridge; Pyramid Peak, Northeast Ridge |
| Class 5 | Technical climbing | Requires considerable knowledge of ropework, knots, and protection to climb. Although "free-soloing", or climbing without a rope, is admired and even revered by some as the purest form of climbing, it is a rare sort of person that enjoys climbing significant class 5 pitches without a rope. Most people will want rappel, not downclimb, a class 5 pitch, especially if it is of significant length. | Longs Peak, North Face; Vestal Peak, Wham Ridge |
 |
| A 5.12a sport climb in Colorado |
|
 |
| 5.8+ dihedral in Colorado National Monument |
|
 |
| 5.7 trad near Carbondale |
|
A breakdown of the YDS 5th class subgrades:
| Difficulty Level | Type | Description | Examples |
|---|
| 5.0-5.4 | Easy climbing | Face: Very good and plentiful holds. This is generally considered "easy" climbing. Usually less than vertical with large jug holds or many otherwise positive holds. Sometimes there seems to be some overlap with easy class 5 climbs and harder class 4 climbs. Short sections of low class 5 are often soloed by experienced climbers.
Crack: It is hard to find a crack that is sub 5.6. If there is such a thing it is almost assuredly sub-vertical and accompanied by numerous face holds. | Longs Peak, North Face; Vestal Peak, Wham Ridge |
| 5.5-5.6 | Easy moderate | Face: Getting a little more challenging now. Often vertical with very good and plentiful holds or slabs with easy-to-find edges. Holds are abundant for climbers of any height and almost ladder-like in quality.
Crack: Probably sub-vertical and likely with plentiful accompanying face holds. Solid comfortable, jams throughout and very little "awkward" places. | Spearhead, North Ridge; Lumpy Ridge, Batman and Robin |
| 5.7-5.9 | Moderate | This is probably the most popular range and the domain of the weekend warrior. Reasonably athletic, first-time climbers with no experience can sometimes climb at this level on top rope, especially 5.7s and 5.8s. In the alpine realm, however, these routes can be quite advanced.
Face: Plentiful holds that are mostly positive. Climbs of this range can be fully vertical but are almost never overhanging. Some 5.9s could possibly be overhanging for very short sections.
Crack: Just sub-vertical to vertical cracks in the good sizes, espcially thin to perfect hands. Sometimes fingers, espcially if face holds present. | Petit Grepon, South Face; Crestone Needle, Ellingwood Arete; Independence Monument, Otto's Route |
| 5.10-5.12 | Advanced | Rock of this level requires considerable technique and skill. Many climbers never achieve this level, 5.12 in particular. Usually requires considerable time investment to acquire. Routes rated 5.10 or above are usually subdivided into letter grades a, b, c, and d. Though there is often much debate over these letter grades, there is a noticeable difference between a 5.10a and a 5.10b. This is an elite level for trad climbing, as many people climb one or two number grades lower when placing gear.
Face: Requires use of very small holds, crimps, side-pulls, gastons, underclings stemming, etc, a great deal. 5.10s can be overhanging with very good holds. 5.12s are often overhanging with technical movement like dropped knees, etc. 5.12 slabs are very blank.
Cracks: Very difficult cracks with the bare minimum of accompanying face holds. 5.12 cracks are often in the ringlock size or in a better size but overhanging. | Longs Peak, Casual Route; Sunlight Spire, Standard Route;Eldorado Canyon, The Naked Edge |
| 5.13-5.14 | Elite | Let's face it, climbing at this level is for the very best. Poor holds, monster overhangs, little rest, gymnastic ability, all qualities you are likely to find on a route at this level. Climbing 5.13s and 5.14s requires many hours of dedicated perseverance and considerable natural ability.
Face: This is hard for me to say, I have never climbed at this level, though I have seen a lot of 5.13 and some 5.14 climbs. They are almost always overhanging and requiring amazing use of body position to utilize angled sloper grips. A 5.13 slab is extremely rare.
Crack: Gnarly tips cracks, possibly overhanging, no face holds. There really arent a ton of cracks of this level out there. Overhanging off-widths can get this rating, like Belly Full of Bad Berries in Indian Creek. Recently, the supposed "hardest off-width in the world" was put up in Canyonlands National Park, Utah. Dubbed "The Century Crack" it is a heinously long, flat overhanging off-width that was freed and given a 5.14b rating.
Check out this video of Mason Earle tackling Squamish's Cobra Crack, one of the most famous 5.14 trad climbs in the world. | Rifle Mountain Park, Zulu; Clear Creek Canyon, Prime Time to Shine |
| 5.15 | Virtuoso | Very few climbers in the world have ever achieved this level and all are essentially household names. Chris Sharma, Tommy Caldwell, Dave Graham, Adam Ondra, and a handful of others complete the list. Though Tommy Caldwell never graded it officially, Flex Luthor, a sport climb in Colorado, was generally considered the first 5.15 in the United States. Caldwell redpointed the route in 2003, and only commented that it was "significantly harder than [neighboring] Kryptonite", which was the first route in the U.S. graded 5.14d. Luthor has yet to be repeated and thus the rating un-confirmed. Here is a video of Chris Sharma and Adam Ondra working what is now known as the hardest climb in the world. | Fortress of Solitude, Flex Luthor, La Dura Dura, Spain |
 |
| 5.7 granite trad climb in Unaweep |
|
 |
| 5.10b overhang on the West Slope |
|
SAFETY/PROTECTION RATINGS
Since the YDS system accounts only for the technical difficulty of the hardest move, a need arose to somehow quantify the quality of protection, and therefore safety, of a given route. Consequently, James Erickson developed a safety grade based on movie ratings. It is important to note, however, that these ratings are given with the assumption that the leader has placed gear perfectly as the route allows. In other words, in inexperienced hands ANY climb can get the most dangerous rating.
G: Good. Protection is more than adequate, with placements available to minimize the fall factor. A leader who places gear properly should never be in danger of hitting ledges or the ground in the event of a fall.
PG: Pretty good. Protection is considered adequate, although moments where there is ledge-fall potential may exist. It is rare to see either a G or PG rating attached to a climb, as it is only when a climb is PG-13 or higher is it noted in guidebooks.
PG-13: Moderate. Protection is generally good with perhaps a section where there is potential for a long, risky fall. This rating is often applied when protection for a climb is not totally adequate but not bad enough to merit a full R or X rating.
R: Runnout. Even with perfect gear placements there are long sections of unprotected rock where if a lead climber fell they would be subject to a long, dangerous fall likely resulting in serious injuries.
X: Extremely runnout. Similar to the R rating, only taken to an extreme. If a leader falls on an X-rated climb, death is a real possibility.
GRADE RATINGS
The American system also includes a Roman numeral "grade" that attempts to evaluate a climb in terms of both time required and technical difficulty. The grading system attempts to combine factors such as: length, commitment, routefinding, difficulty of hardest pitch, average pitch difficulty, number of technical pitches, and others.
Grade I: Short climb requiring a couple hours or less of any difficulty. Single or two-pitch climbs are usually graded I though the numeral is not usually included on the difficulty rating.
Grade II: Half a day to 3/4 of a day of any difficulty. Most 14er hikes in Colorado are graded as II.
Otto's Route on Independence Monument near Grand Junction, Colorado is usually graded II.
Grade III: Most of a day with some technical climbing. Long semi-technical climbs such as
Ellingwood Ridge on La Plata Peak in Colorado can also receive a Grade III rating.
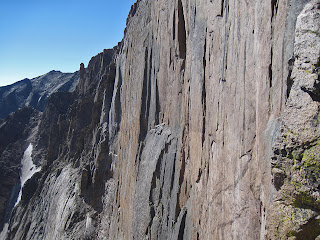 |
| Longs Peak's The Diamond |
Grade IV: A full day of technical climbing with the hardest pitch being at least 5.7 in difficulty.
The Casual Route on Longs Peak is Grade IV.
Grade V: Requires a day and a half with the hardest pitch being at least 5.8 in difficulty. Very long multi-pitch climbs often requiring aid climbing.
The Yellow Wall on the Diamond is usually graded V.
Grade VI: Multi-day climb with many technical pitches requiring difficult free climbing and aid as well. Most of the famous routes on El Cap in Yosemite are Grade VI as well as climbs such as the
Hallucinogen Wall in Black Canyon National Park and the North Face of
Mt. Hooker in the Wind River Range.
Note: While the grading system specifically lists criteria such as "takes multiple days," advances in the sport have proven these factors as unreliable. Grade VI routes on Halfdome and El Cap, after all, have been climbed in a day or less by modern pioneers.
AID RATINGS
The last component you are likely to see in a rating for a climb in the United States is an aid rating. Aid climbing occurs when terrain becomes too difficult for a leader to climb free and resorts to climbing on gear itself, rather than the rock. Pitons, gear grabbing, etriers, cam hooks, etc, are all components of aid climbing. Personally, I don't do a lot of aid climbing as of now, so the following descriptions are greatly in-debted to
Mountaineering: The Freedom a the Hills, a book that anyone interested in alpine climbing should own, and several other sources.
A0: Fixed protection in place, such as a bolt ladder. Sometimes when a free climber pulls on a quickdraw or camalot they will say they did some "A0" on that particular climb.
A1: Easy aid placements, and almost every placement is capable of holding a fall.
A2: Generally good placements, but they may be difficult to place. Intermittent bad placements are also possible.
 |
| The Titan, home of the famous aid route Sundevil Chimeny (5.9 A 3) |
A3: Hard aid. Requires active testing of placements. Each pitch takes a very long time to lead and there is potential for some very big falls, up to around 80 feet or so. Most falls, however, are not particularly hazardous.
A4: Serious aid. Big half-rope length falls with potential for grounding. The vast majority of placements are only capable of holding body weight. In a sense, this is almost like the "R" rating in the safety section.
A5: Placements hold only body weight for an entire pitch. Any lead fall for the entire pitch is going to be factor 2 (i.e. twice the length of the rope that is out) or the fall will directly ground the leader. Comparable to the "X" rating in the safety section.
A5+/A6: Occasionally people have proposed an A6 grade for several climbs, though many deny the possibility that such a grade can exist. Supposedly, and A6 climb is like an A5 with body weight placements for an entire pitch but with bad anchors as well.
Aid climbs can also be rated C0-C5 which means basically the same thing except that a route can be climbed without the use of pitons, bolts, or drilling. This category is called "clean aid". Once a route has gone clean it is expected that subsequent climbers will honor this style and not further mar the rock.
This
article, written by Richard Jensen, is an intriguing read and will help provide an empirical understanding of aid climbing. Further investigation of climbing figures like Royal Robbins, Warren Harding, Jim Beyer, Layton Kor and others will help you understanding more about the sport of aid climbing in America and its illustrious history.
CONCLUSION
Clearly, the system for rating the difficulty of a climb is complicated and takes a long time to master. There is plenty of room for subjectivity and debate. One person's 5.7 is another's 5.9. While some people shun such ratings debates, I actually find them interesting, as long as people do not take them too seriously. True climbers wont waste too much time in rating's debates but instead will be out on the rock, having fun no matter what a climb is "rated". Still, after reading this article you can look at a rating such as IV 5.10c R A3 and have an idea of what to expect from such a climb.
APPENDIX A- Comparison chart for difference difficulty grades:
| YDS | V-Scale | UIAA | French | Font. |
|---|
| 5.0 | -- | II | -- | -- |
| 5.1 | -- | III | 1 | -- |
| 5.2 | -- | III | 2 | -- |
| 5.3 | -- | IV | 3 | -- |
| 5.4 | -- | IV | 4a | -- |
| 5.5 | -- | IV+ | 4b | -- |
| 5.6 | VB- | V | 4c | 1 |
| 5.7 | VB | V+ | 5a | 2 |
| 5.8 | VB+ | VI- | 5b | 3 |
| 5.9 | V0- | VI | 5c | 3+ |
| 5.10a | V0 | VI | 6a | 4 |
| 5.10b | V0 | VI+ | 6a | 4 |
| 5.10c | V0+ | VII | 6a+ | 4+ |
| 5.10d | V1 | VII | 6b | 5 |
| 5.11a | V1+ | VII+ | 6b+ | 5 |
| 5.11b | V2 | VII+ | 6c | 5+ |
| 5.11c | V3 | VIII- | 6c+ | 6A |
| 5.11d | V4 | VIII | 7a | 6A+ |
| 5.12a | V4 | VIII | 7a+ | 6B |
| 5.12b | V5 | VIII+ | 7b | 6C |
| 5.12c | V6 | IX- | 7b+ | 6C+ |
| 5.12d | V6 | IX | 7c | 7A |
| 5.13a | V7 | IX | 7c+ | 7A+ |
| 5.13b | V8 | IX+ | 8a | 7B |
| 5.13c | V9 | X- | 8a+ | 7C |
| 5.13d | V9 | X | 8b | 7C |
| 5.14a | V10 | X | 8b+ | 7C+ |
| 5.14b | V11 | X+ | 8c | 8A |
| 5.14c | V12 | XI- | 8c+ | 8A+ |
| 5.14d | V13 | XI | 9a | 8B |
| 5.15a | V14 | XI+ | 9a+ | 8B+ |
| 5.15b | V15 | XI+ | 9b | 8C |
FURTHER READS
-
14ers are Dead!!!
-
Hardest Move vs. The Route as a Whole: A Discussion of Grading Difficulty
-
Ten Class 3 Colorado Classics
-
Ten Class 5 Colorado Classics
-
Five Hardest 14er Cruxes
Visit THE ARCHIVE: A list of most of our articles sorted by department
Follow us on Twitter!
Copyright notice: This website and all its contents are the intellectual property of www.coloradomountaineering.com and its authors. None of the content can be used or reproduced without the approval of www.coloradomountaineering.com.
Climbing and mountaineering are dangerous!! Please see the DISCLAIMER page
For information about how to contact us, visit this link


